Chatbot using Microsoft Bot Framework - Part 2
A guide on how to build chat bots using Microsoft Bot Framework - Part 2
This is second post in the series of building a chat bot. If you haven’t gone through Part 1, you can find it here. It sets the context and talks about basics of Microsoft Bot Framework. The source code for bot can be found at my github repo.
In this article, we will add first feature to our bot which is to answer question about me. The bot should answer questions such as “Who is Ankit”, “Who is author of this blog”, etc. As we saw previously, the bot in itself is dumb. To understand such questions we will need to take help from LUIS.
Language Understanding and Intelligence Service
LUIS Natural Language Processing Service is one of the cognitive services by Microsoft. In general, there are two things LUIS can possibly do -
-
Intent Recognition: Whenever a user sends a message to our bot, he has an intent. For instance if user types “I want to order a pizza” his intent is “OrderPizza”, “I want to rent a car” intent is “RentCar” etc. Given a sentence, LUIS will to classify the sentence into one of the trained intents and give us probability score for each intent. The way we achieve this is by defining the intents and training the LUIS with some sentences (called utterances) by manually classifying them. This type of learning is called Supervised Learning and the algorithm which LUIS uses to classify is Logistic Regression.
-
Entity Detection: In a sentence, we might be interested in a word or group of words. For example in “I want to order a pepperoni pizza” text “pepperoni” is the word we are interested in. Another example, “Rent a car from London airport tomorrow” - “London airport” and “Tomorrow” are the words which are contextually important to us. LUIS can help us by recognizing these words (called entities) from the sentence. LUIS uses Conditional Random Fields (CRF) algorithm to detect entities, which falls under Supervised Learning. Therefore this is again achieved by training LUIS with some words manually before it can start detecting.
A great tutorial explaining these in detail is present at Luis Help. It is a short tutorial which I recommend you go through it later for better understanding.
Create a LUIS App
Go over to luis.ai and create a new App. By default, we get one intent called None. Any utterances which we feel does not classify into any other intent in our app should be trained under None. Training None is important, I have seen many people not training it sufficiently.
Training Luis
Let us create a new intent named AboutMe. While creating intent we have to enter an example sentence that would be classified to it. Enter “Who is Ankit” and created the intent. Click on Submit to classify the sentence to the intent. We can add more utterances by entering it into input box and classifying it to the intent as shown below. Add some utterances for None intent too.
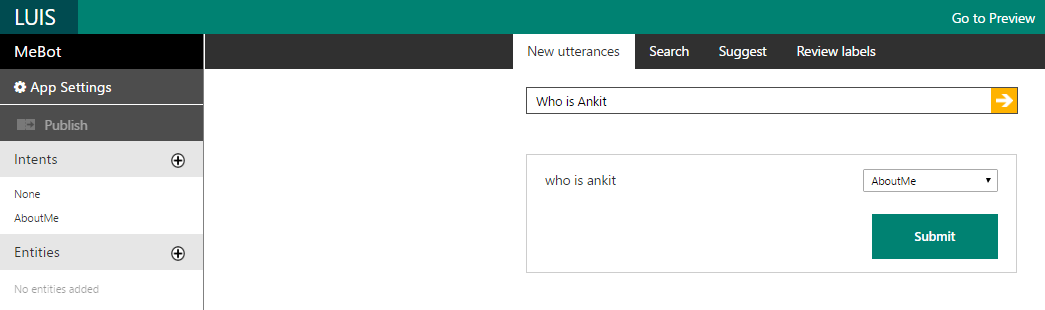
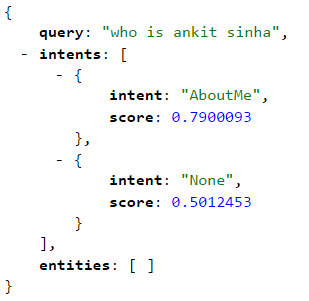
Train the LUIS by clicking on “Train” button on bottom left. Next, publish the app so that it is available via HTTP. We can test the app and see what result LUIS returns. LUIS will classify the query into each intent and return us probability score for each.
I have exported the LUIS app and added the JSON to the solution.
LuisDialog
Once we have created the LUIS app, next step is to integrate it with our bot. Fortunately Bot Builder SDK provides us an easy way to integrate with LUIS. Enter LuisDialog. It derives from IDialog and does the low level plumbing work of interfacing with LUIS and deserializing the result back to LuisResult. Let’s go ahead and create a new class called MeBotLuisDialog and derive it from LuisDialog. Next we add the following method to the class -
[LuisIntent("None")]
public async Task None(IDialogContext context, LuisResult result)
{
    await context.PostAsync("I'm sorry. I didn't understand you.");
    context.Wait(MessageReceived);
}
Let me explain each line in above -
-
[LuisIntent("None")]: Apart from calling LUIS API,LuisDialogalso takes the result returned by LUIS, calculates the best intent based on probability score and calls the corresponding method defined in our dialog decorated withLuisIntentattribute matching the intent name passed as argument with the best intent detected. So, if LUIS classifies a sentence and scores it highest to “None” intent, our above method will get called automatically. -
public async Task None(IDialogContext context, LuisResult result): Our method accepts two parameters, first is of typeIDialogContextwhich as discussed before contains the stack of active dialog. It also has helper methods to send reply back to the user which we do in the next line. The second parameter is the result returned by the LUIS which is deserialized asLuisResult. -
await context.PostAsync("I'm sorry. I didn't understand you."): We use the the Dialog Context to send a reply back to the user. Since this method is called when our bot did not understand the user’s intent, we return back a friendly response. Later we will modify it to return more detailed response. -
context.Wait(MessageReceived): This is important. Before exiting from dialog, we must mention which method will be called when the next message arrives. If you forget it, you will get a very ambiguous runtime error something in the line of “need ‘Wait’ have ‘Done’”. We again use dialog context to specify it.MessageReceivedmethod is defined inLuisDialogclass and is the same method which calls the LUIS endpoint, calculates the best intent from the result and calls the relevant method for the intent.
So in short, we reply back to user saying that we didn’t understand and specify that next message should also be sent to the LUIS to understand the user intent. Let us add method to handle “AboutMe” intent.
[LuisIntent("AboutMe")]
public async Task AboutMe(IDialogContext context, LuisResult result)
{
    await context.PostAsync(@"Ankit is a Software Engineer currently working in Microsoft Center of Excellence team at Mindtree. He started his professional career in 2013 after completing his graduation as Bachelor in Computer Science.");
    await context.PostAsync(@"He is a technology enthusiast and loves to dig in emerging technologies. Most of his working hours are spent on creating architecture, evaluating upcoming products and developing frameworks.");
    context.Wait(MessageReceived);
}
This is also similar to the “None” intent handler. Instead of sending only one response, I send two since the sentences are quite big. The response is quire simple but let us keep it this way. Decorate the MeBotLuisDialog class with [LuisModel("modelid", "subskey")] with correct LUIS ModelId and Subscription Key. You can get the keys from published URL of your LUIS app.
There is just one more place that we need to change before we can test our bot that is in MessageController. Replace the entire If section of the method with the one below -
if (activity.Type == ActivityTypes.Message)
{
    await Conversation.SendAsync(activity, () => new MeBotLuisDialog());
}
Done. Press F5 to run the bot. Open the emulator and send a text to check if the bot is replying properly.

One last feature to add. When a user add/open our bot for the first time, it is good practice to show a welcome text having information about what our bot can do and how to interact with it. Let us add a small help text and send it to the user when he first interacts with our bot. The place to do it is in ActivityTypes.ConversationUpdate block in MessageController. Microsoft Bot Framework supports Markdown, which we can utilize to give a richer experience to our user. I have added the relevant welcome text as below.
else if (message.Type == ActivityTypes.ConversationUpdate)
{
    // Handle conversation state changes, like members being added and removed
    // Use Activity.MembersAdded and Activity.MembersRemoved and Activity.Action for info
    // Not available in all channels
    string replyMessage = string.Empty;
    replyMessage += $"Hi there\n\n";
    replyMessage += $"I am MeBot. Designed to answer questions about this blog.  \n";
    replyMessage += $"Currently I have following features  \n";
    replyMessage += $"* Ask question about the author of this blog: Try 'Who is Ankit'\n\n";
    replyMessage += $"I will get more intelligent in future.";
    return message.CreateReply(replyMessage);
}
Registering the bot
Before registering, we need to publish our bot and make it accessible from internet over HTTPS. Once done, head over to bot registration portal. An excellent article on how to register the bot is here. Once registered, update the web.config with correct id and secret and publish the bot again.
Registering the bot will auto-configure it with skype. But let us go a step further and configure the Web Chat Channel. Configuring web chat gives us an iframe which we can include in our web site. I have added the iframe to my blog and the bot appears at the bottom right corner. This is so cool.
I have tagged the code till this point as part2 in my repo. In next post we will add more features to our bot. Meanwhile if you have any questions or feedbacks, post a comment below.