Chatbot using Microsoft Bot Framework - Part 1
A guide on how to build chat bots using Microsoft Bot Framework - Part 1
There is a lot of buzz in market regarding Chatbots. Microsoft, in Build 2016, showcased their own bot framework and released it on Github. So finally we had an open source and free platform to create our own bots.
In this and next few articles that will follow, I’ll talk about Microsoft Bot Framework and build a bot from scratch. Instead of explaining each and every feature of Bot Framework with code snippets, which would lead to a boring post, we will embark into a journey of building a silly bot to a bot that does something useful. On the way, I’ll explain some of the features of Bot SDK, and use it add more capabilities to the bot. Also I would link a lot to the official documentation wherever a deeper understanding is required. Documentation is pretty neat and it makes no sense to explain the detail here also, why to reinvent the wheel? However this is a new learning for me too, so if you find a better way than mine to do the same thing then comment below.
Microsoft Bot Framework
Microsoft Bot Framework consists of 3 parts -
- Bot Builder SDK: Bot Builder SDK is open source and provides us with features to model our conversation, state management, rich attachments etc. SDK is available in C# and Nodejs.
- Bot Connector: Bot connector acts as an adapter between our bot and numerous channels that it supports. It also has other features such as state management, storage service, message routing etc.
- Bot Directory: Bot Directory is a public directory for published bots. Bots are reviewed before being listed and publicly available on Bot Directory.
Excellent overview of individual pieces are available at their official documentation.
Note: While writing this article, Microsoft Bot Framework is in Preview.
Bot Framework Basics
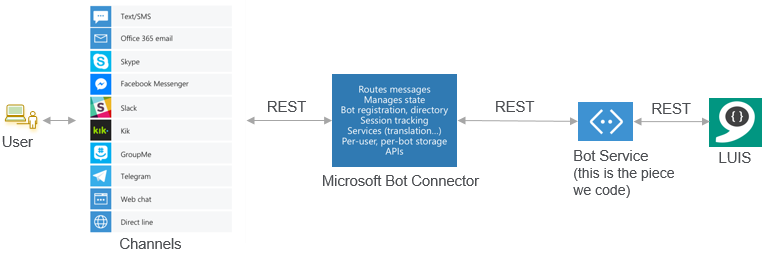
Before we continue, let me explain basics of how a bot works. When we will create a new project using the bot template, we will see the bot is nothing but a simple Web Api Project. In fact, that is all the bot is, a dumb Web API service. This Web API will be hosted and will be registered with Microsoft Bot Connector. The Bot Connector acts as an adapter between our web service and different Channels. Channels such as skype, facebook messenger, etc are platforms which our user will use to chat with the bots.
I have put up a small diagram below showing how each component interacts. In short, a user uses a channel to send message to our bot. The message is routed through the Microsoft Bot Connector, which sends a POST request to our Bot Service. The POST request’s body will contain the original text typed by the user along with other meta-data which we will see later. Upon receiving the request, our bot can take any action such as querying database or replying back to the user. In itself, our bot is pretty dumb. The intelligence comes when we integrate with one of the Cognitive Services, in this case Language Understanding and Intelligence Service(LUIS). LUIS, Natural Language Processing as a Service is one of the Cognitive Services provided by Microsoft. We will see later how LUIS works. Going back to diagram, upon receiving the message from user, our bot may send the message text to LUIS to understand what user is saying and then reply back appropriately.
We will get into more details later. For now, let’s get started
What are we building?
After a lot of thinking, I could just come up with a lousy idea of a bot that would answer questions about myself and this blog. So the bot will -
- Answer questions about me. Essentially replacing About Me section.
- Give results of recent posts I have written.
- Allow users to send feedback to me.
As you will see later, I am very bad at naming. So in lack of any good name, let’s call this bot MeBot (duh!). Source code of the bot can be found here. I will use C# to develop the bot as I am more familiar with it.
Setup Project
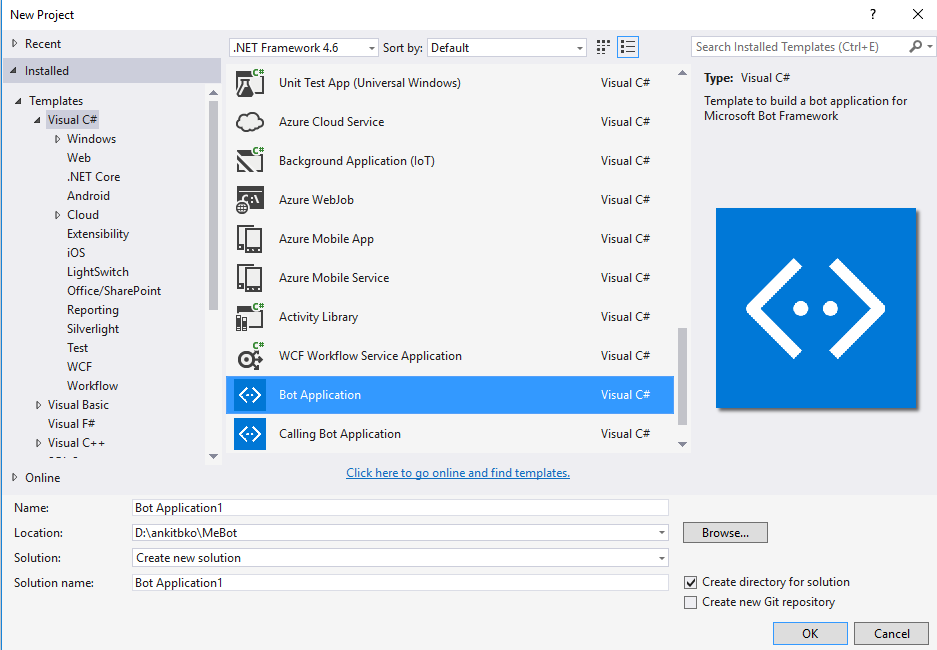
We will add features incrementally to the bot and over multiple blog posts. But first step is to create a project using Bot Application Template. You can download the Visual Studio Template here. Next, update the nuget package of Microsoft.Bot.Builder to latest version. Bot Template is not updated as frequently as the SDK, so always check and update the SDK to newer version when creating a new project from the template. While you are at it, also download and install Bot Framework Emulator from the above link. The emulator will help us to test our bot locally while development.
Bot Builder SDK Basics
There are three critical pieces in SDK that we need to understand before proceeding.
-
Activity: Activity is the JSON data (POST Body) that we send to and receive from the Bot Connector. You can viewActivity.csclass to see all the data which are reviewed and sent. The one which interests us most isTextproperty which will contain the message which user typed. You can get to know more aboutActivityin official documentation -
Dialog: Dialogs are building blocks of the bot. Dialogs model a conversation between user and the bot. It is a serializable class which has the state and the methods through which the interactions are managed. Dialogs are created by implementingIDialoginterface. Dialogs can also be composed with other dialogs, making it reusable. -
Dialog Context: Dialog Context maintains a stack of active dialogs. When the bot replies, it serializes the Dialog stack and sends it to the Bot Connector along with theActivityin the POST Body. The Bot Connector will store the stack internally. When the user sends another message, the Bot Connector will attach the Dialog Stack for the particular conversation and send it to our bot. The Bot Builder, upon receiving the Dialog stack, deserializes it, pops the top most dialog and executes the next method.
You can read more details about Dialogs here. If any of it didn’t make sense don’t worry, we will see them in action soon.
Back to our project
Open the MessageController.cs and you will find single POST method which accepts Activity object. The first line if (activity.Type == ActivityTypes.Message) checks if the Activity is of type Message. Message ActivityType represents communication between a Bot <–> User. There are other ActivityType which are present in HandleSystemMessage(Activity message) method. The comments there are self explanatory and more information on ActivityTypes are mentioned in the documentation.
The If block handles the case when user has sent a text message to the bot. The bot will get the incoming text, count the length of the message, reply it back to the user. Note how the reply is created and sent to the Bot Connector. The reply is sent as a separate HTTP request rather than inline to current one. The Else block handles special ActivityType which we will ignore for the moment.
Run the project
The default template creates a simple bot which echoes back number of character user typed. Before proceeding let us check if everything is working. Press F5 and run the bot in IIS Express. Open the Bot Emulator and change the Bot Url to hosted one and send any message. If everything is working, the bot should reply back the number of characters you entered which we see on the left window. On the right we see the JSON request and response for the message. This is what gets deserialized into Activity object.
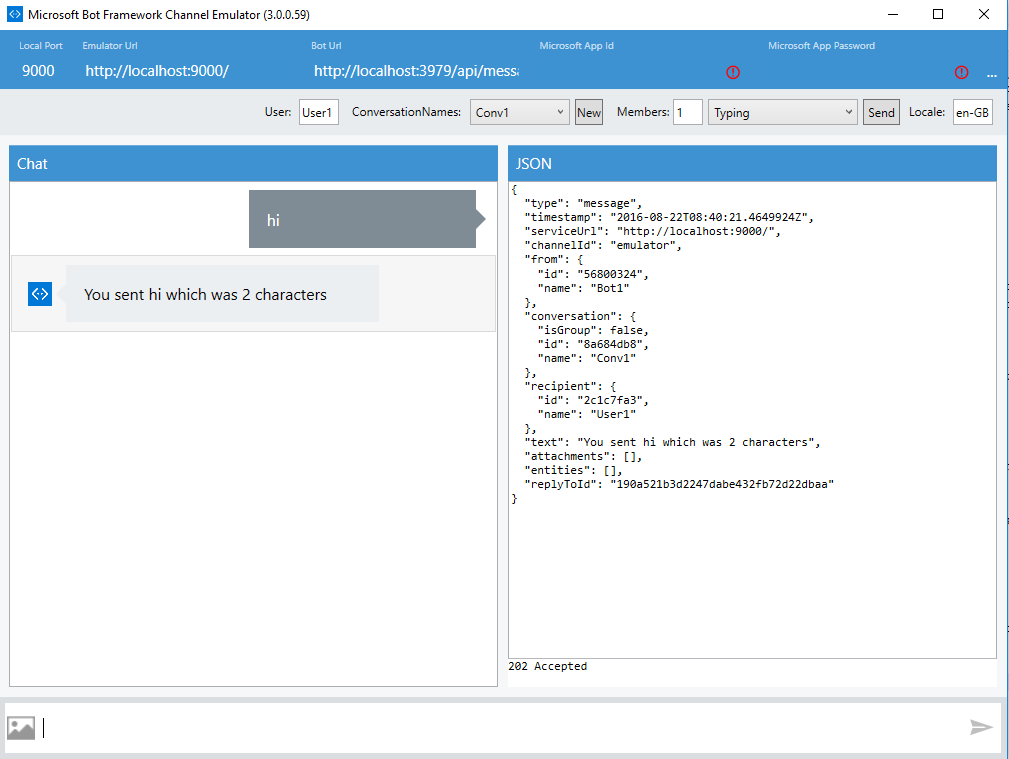
Everything works fine. Good.
I will wrap up here. In the next post we will implement first feature i.e. answering questions about who I am. To do this we will need to understand how LUIS works and integrate it with our bot.
Meanwhile if you have any questions, post it in the comments.