Modernizing a legacy application
Migration approach for legacy WCF service into ASP.NET Core
This blog was co-authored by Srikantan Sankaran. You can follow him on twitter and on his blog.
There are huge number of applications still running on on-premise data centers that were written more than a decade ago. With emergence of cloud and the advantages it brings, there is a demand to migrate these applications to cloud and in process modernize them to utilize features that cloud provides in order to optimize performance and cost. This is more prevalent in line of business (LOB) applications that every business requires to function (and large business have 100s of them). These applications were written ages ago using latest technology available at that time but are now obsolete.
Recently I had an opportunity to work on modernizing a legacy LOB application comprising of ASP.NET WebForms, WCF service and Entity Framework. In this post, I’ll share my learnings and present an approach to tackle such kind of migrations. For this post I will only focus on migrating the APIs and not the UI as approach there is completely different.
Strategies for moving to cloud
There are two approaches to moving to cloud -
- Lift and Shift : Lift and Shift as name suggests means running as-is application in cloud either as PaaS or IaaS service. Although this is perfectly viable solution given that your cloud provider supports running these existing technologies, you do miss out on cloud features and is typically not the most optimized way of running your application on cloud. There are numerous article and documentations on which technologies are supported by different cloud service so we will leave it at that.
- Modernizing: The second approach of modernizing is much more interesting. Here we would like to refactor the application using new technologies to better utilize the cloud infrastructure. But in process we want to avoid rewriting the application from scratch and reuse the existing code as much as possible.
Approach for modernizing legacy application
Lets be clear of our vision - Modernize the application while reusing the existing code and incorporate the current software engineering best practices.
I found that migrating the application in a incremental manner worked best. This means we take a single use case from the application, investigate, migrate and test it and repeat the process. If you are migrating a web API which does bunch of things target to migrate single use case end to end first as this will allow you to setup the infrastructure around the new application and have better understanding of the complexity which will eventually help in estimating the effort required to migrate other use cases. This also have additional benefit of having an option of splitting the application per use case into serverless platform like Azure Functions or AWS Lambda. There are two phases involved in migration of single use case -
-
Investigation phase (Top-Down): Start out with the outermost layer of the application and drill down into inner layers to understand the flow. Most of the legacy application follow typical N layer design i.e view/service layer, business logic layer followed by data access layer. In this scenario outermost layer is view* or service layer and innermost is data access/repository layer. Our objective here is to have the understanding of how the application is structured and find out all the dependencies of a function. For example if there is a function
Fooin outer layer, we need to find is what all dependencies/functions that needs to be migrated before we can migrateFoo. In this way we end up creating a mental map or a tree of dependencies of every function. -
Execution phase (Bottom-Up): Once we have the dependency tree mapped out, we start migrating the innermost dependency (leaf node in dependency tree) and work our way upwards. Actual migration steps will depend upon what is the target technology and the extent of rework required to make the existing code work.
I will showcase the approach by modernizing a legacy WCF .NET application which I found in code project and deploying it into Azure. However the approach explained above can be used for any kind of application and any cloud provider. The sample application is part of an article by Wusheng Hu written in 2012. The article is very well written and showcases the architecture and technologies prevalent almost a decade ago and I recommend you to give it a read. The source code for this is here
Northwind Application
Our legacy application resides in legacy folder of the repo. The application uses Northwind database to perform basic CRUD operations. I have cleaned it up and removed unnecessary projects. To keep it simple we will only be focusing on the service layer and not the client. The service layer contains a WCF service and a data access layer which uses Entity Framework 4 to connect to a SQL Server. The application targets .NET Framework 4.0.
When we think of final desirable state in Azure there are multiple options available to us. We can either deploy it in App Service, Azure Kubernetes Service or even develop it as Azure Functions app. Therefore we would like the final version to be able to support any of these and not be coupled with a single cloud service. Thus we will migrate the class libraries to .NET Standard and WCF to ASP.NET Core. Since .NET Core is cross platform we get flexibility of dockerizing our application and deploying it in any cloud service that we wish. Having said that, Azure Functions would require few other changes but overall our code would be cloud-ready. For this blog we will keep it simple and just develop it as ASP.NET Core service.
Setup
I am using Visual Studio 2019 16.4.4 version for this migration. Run the Northwind.sql script and create the database in SQL Server. You can use SQL Server express for this. Then edit the Web.config file in GH.Northwind.Business.Host project and edit the connection string as required.
Thats it, try starting the Host project and it should launch the WCF service. Navigate to /northwindSvr.svc/GetCustomers and you should get back a JSON response.
We will be targeting .NET Core 3.0 so download it from here.
.NET Portability Analyzer
.NET Portability Analyzer is a great tool to find potential issues we will face in migrating our application to .NET Core. The tool provides detailed report on how ready is our application to be ported to different runtime. The tool is also available as Visual Studio Extension which we will use to analyze our solution so have it installed.
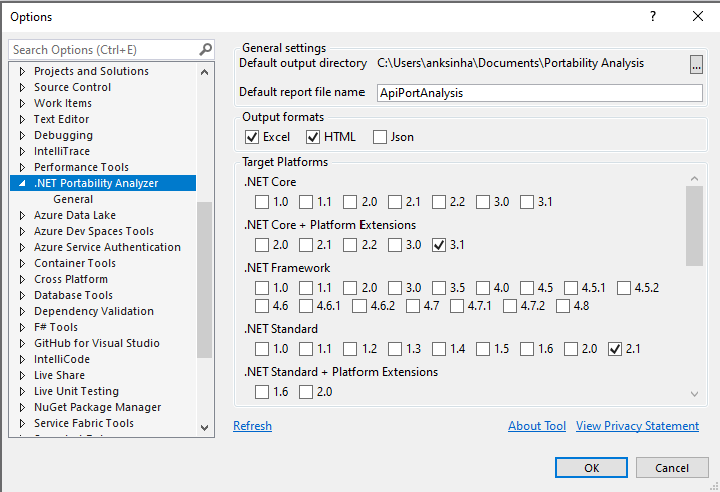
Configure the tool by right clicking on solution and selecting Portability Analyzer Settings. Under Target Platform only tick .NET Core + Platform Extensions 3.1 and .NET Standard 2.1. Select “Excel” under Output formats to generate excel report.
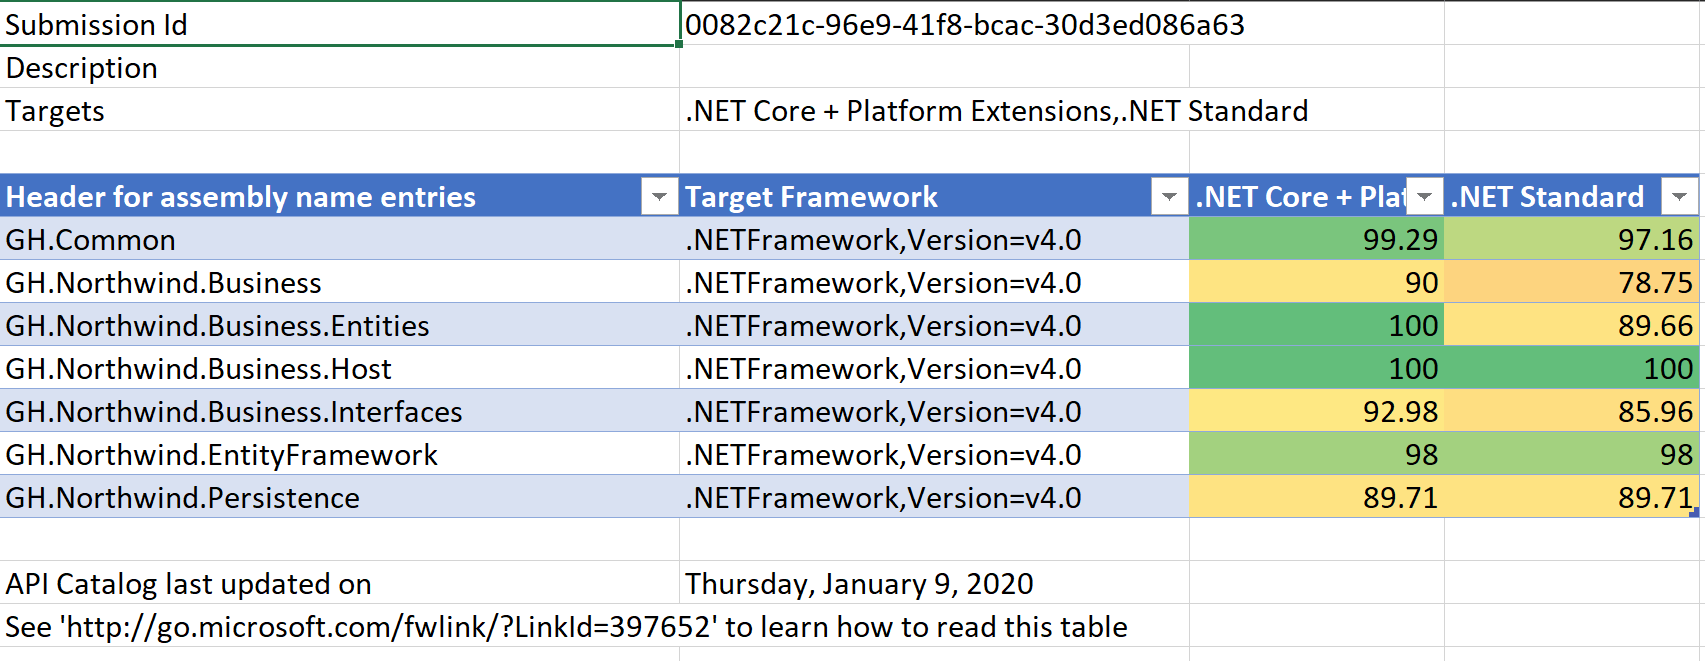
Right-click on the solution and select Analyze Assembly Portability. The generated excel report contains 3 sheet - Portability Summary, Details and Missing Assemblies. Portability Summary gives portability percentage for each assembly which gives us rough idea on how much effort would be required to port each assembly.
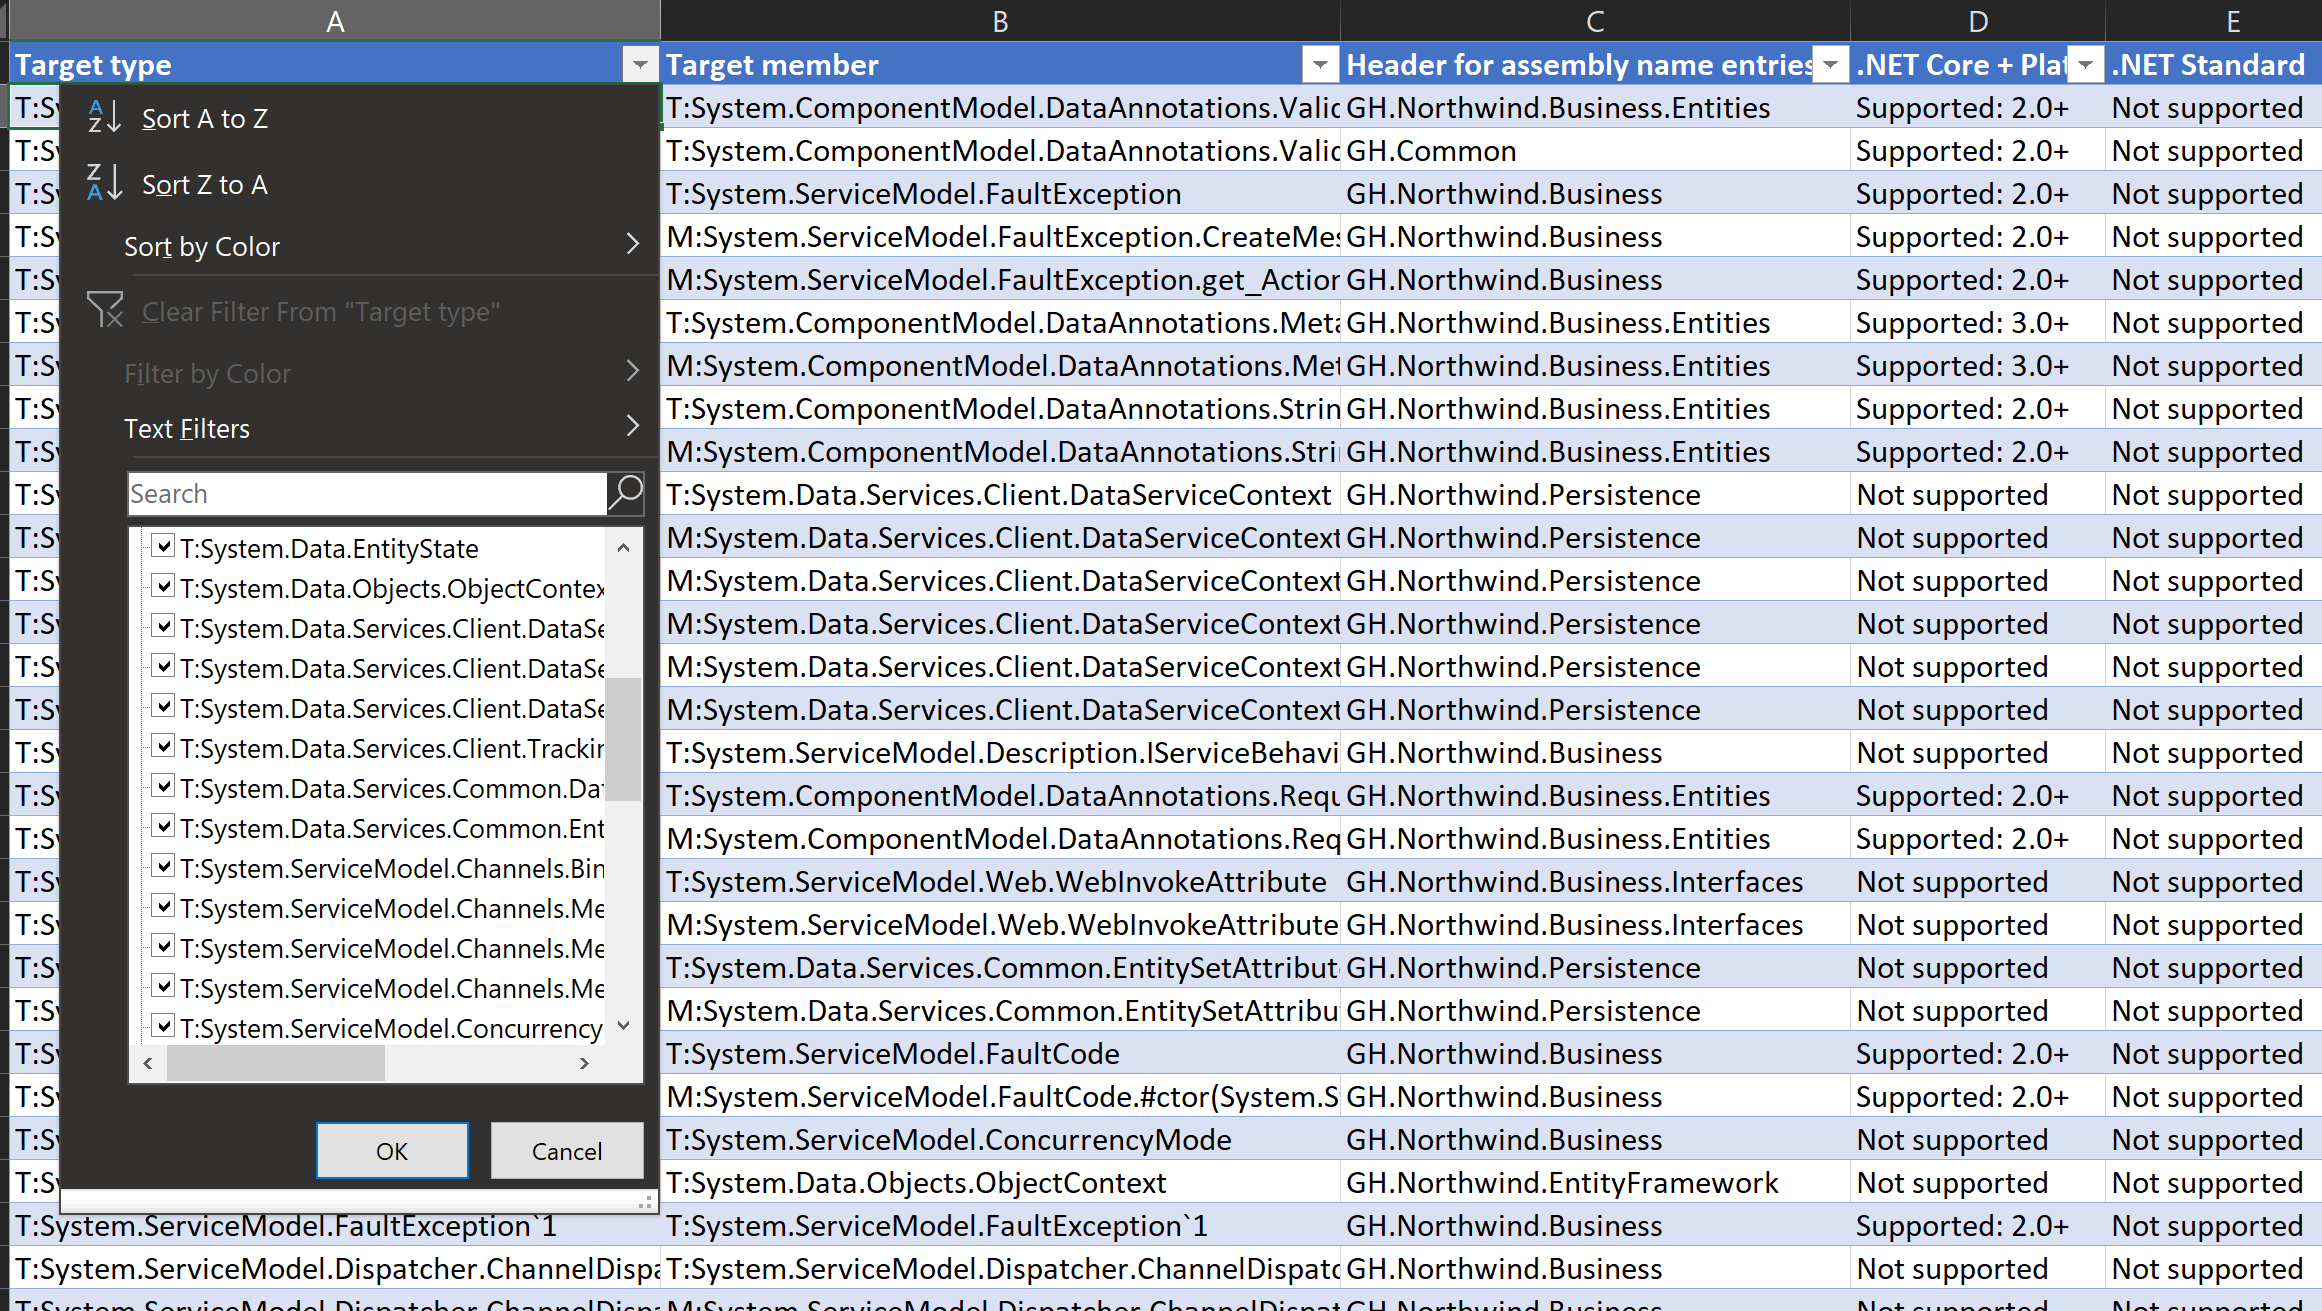
Going into Details tab we see what type used in current application is not supported. You would notice most of the unsupported type are either from System.Data or System.ServiceModel namespace. System.Data namespace corresponds to EntityFramework 4 while System.ServiceModel is used by WCF. With EntityFramework there has been significant changes that we will get to shortly. Meanwhile we would be completely dropping the WCF and its associated types.
Investigation Phase
Here we will broaden our understanding of the the GetCustomer use case and find out all the dependencies of this flow. Delving into the code we see that WCF contracts are defined in GH.Northwind.Business.Interfaces and implemented in GH.Northwind.Business class library. Meanwhile GH.Northwind.Business.Host acts as our hosting project. A single ASP.NET Core project may replace these three projects.
NorthwindSvr.cs in GH.Northwind.Business contains the service implementation. Its static constructor immediately catches our attention which sets up a Service Locater for dependency injection. It also does some AutoMapper configuration.
We are interested in public List<CustomerDto> GetCustomers() method which returns list of CustomerDto. This method calls a static method PersistSvr.GetAll and maps the result using AutoMapper. Going into aforementioned method we see it resolves the type IPersistence<T> from the Service Locater and calls its GetAll method. Looking at the registration we find there is a CustomerPrst class which derives from PersistenceBase<T> base class which hosts our GetAll method. This seems like an implementation of a repository pattern. PersistenceBase<T> contains a static property of type DbContext which is used for database operation. The context itself is created in WCF contract static constructor using connection string read from Web.config.
This essentially completes our investigation phase and we now have understanding of the application. The flow is NorthwindSvr -> PersistSvr -> CustomerPrst -> PersistenceBase. We need to start migrating functions in reverse order.
Execution Phase
The code for modernized application is in “modern” folder.
Migrating Entity Framework
The current project uses Entity Framework 4 which does not support .NET Standard. We have two options - either go with EF Core or EF6.4. What we would want to use will depend primarily upon the features that we need. EF Docs contains helpful feature comparison between EF Core and EF6.4. In our scenario both of them would work so we would go ahead with EF Core which has slightly better tooling support at the moment.
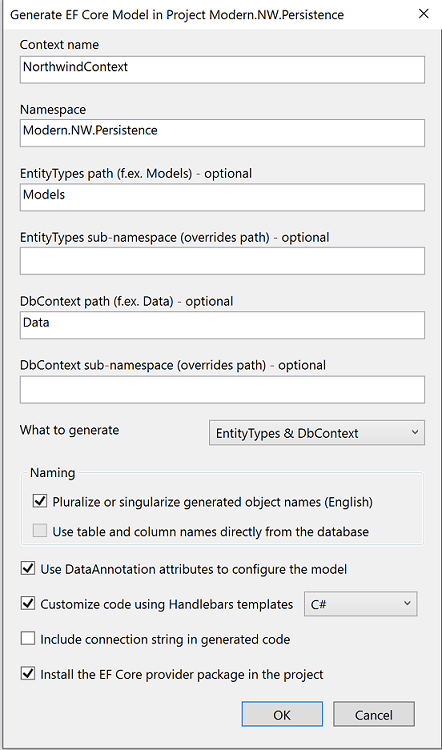
We start with creating a new .NET Standard class project named Modern.NW.Persistence and target .NET Standard 2.0. EF Core does not support database first approach and .edmx. EricEJ’s EF Core Power Tools is useful tool to scaffold the context and entities. Once installed, right-click on the project -> EF Core Power Tools -> Reverse Engineer. Select the database and make sure “Use EF Core 3.x” checkbox is ticked. Select same tables that are in our edmx file. In the next screen you can change the context name and folder location of generated classes. Select the options as required and click “OK”.
We want to maintain the existing design and structure as much as possible so we keep the repository pattern implementation same. Based on your project you may decide to change this implementation or even redesign this layer. We start by copy pasting the IPersistence.cs and PersistenceBase.cs from old solution to new solution. We no longer need BusinessEntityBase that derives from IValidatableObject as validation should happen at a layer above and not in the repository. In PersistenceBase we convert static properties to instance properties and inject them through the constructor. This means even the DbContext is injected. We will manage the lifetime of the DbContext from outer layer and set it to per request as recommended by EF. In .NET Core we want to use dependency injection at all possible place. Next port the CustomerPrst class which derives from PersistenceBase and constructor inject the parameters required by its base class.
One of the major changes that is present is .NET Framework 4.5+ is the Task Parallel Library. TPL allows us to asynchronously execute the code and wait for it without blocking the thread. This means our request thread will not be blocked for the duration of database call and will be available to serve other requests. Entity Framework exposes an async version of most of its methods which must be awaited by the caller. If there exist an async alternative of a method then use it. Go over the repository and replace the EF calls with it’s async counterpart. This will have overarching changes as all such methods must be changed to async and return Task. This change will bubble up across the application as signature of all the methods in the method chain will need to be changed. Even though this change will be big, it will result in massive performance gain by our application.
This completes our data access layer migration.
Migrating WCF
We start by creating a ASP.NET Core 3.0 Web API project and referencing our persistence project. So as to not make this blog post about ASP.NET Core 3 tutorial, I will skip the basics and assume you are already familiar with it. Everything that you would need to know is available in official documentation. Install AutoMapper and AutoMapper.Extensions.Microsoft.DependencyInjection nuget packages
If we were to mimic the WCF service we will end up having a single controller containing all the actions. Instead we may want to refactor and modularize the API and create a proper RESTful APIs. So lets start with creating a Customer controller. We no longer need PersistSvr class to resolve the dependency from service locater. We implement inversion of control through dependency injection and ASP.NET Core comes with DI inbuilt. So we inject the IPersistence in our controller through constructor to use it to get the customers.
private readonly IPersistence<Customer> repository;
private readonly IMapper mapper;
private readonly ILogger<CustomerController> logger;

public CustomerController(
    IPersistence<Customer> repository,
    IMapper mapper,
    ILogger<CustomerController> logger)
{
    this.repository = repository;
    this.mapper = mapper;
    this.logger = logger;
}
We will need to migrate the data contracts from existing application which were used return the result from WCF. Since they are just POCO classes just copy pasting them would work. They are present in DTO folder in GH.Northwind.Business.Interfaces. We move them to a new folder called Models in our ASP.NET Core Web API project. Remove all the DataContract and DataMember attributes as we no longer need them.
We create a Get action method that returns Task<ActionResult<IEnumerable<CustomerDto>>> and call our repository from there.
[HttpGet]
public async Task<ActionResult<IEnumerable<CustomerDto>>> Get()
{
    try
    {
        var customers = await this.repository.GetAll().ToListAsync();
        return Ok(customers.Select(customer => mapper.Map<CustomerDto>(customer)));
    }
    catch (Exception ex)
    {
        this.logger.LogError(ex, ex.Message);
        return StatusCode(500);
    }
}
Its time to setup the DI container. Open Startup.cs and configure DbContext, container and AutoMapper in ConfigureServices method.
public void ConfigureServices(IServiceCollection services)
{
    services.AddControllers();

    services.AddDbContext<NorthwindContext>(options =>
        options.UseSqlServer(Configuration.GetConnectionString("NorthwindEntities")));

    services.AddScoped<IPersistence<Customer>, CustomerPrst>();

    services.AddAutoMapper(config =>
    {
        config.CreateMap<Customer, CustomerDto>();
    }, typeof(Startup));
}
We read the connection string from User Secrets. It is bad practice to have secrets in appsettings.json. Instead a secret management service like Azure Key Vault should be used. For deployment environment you could use Secret Manager tool which comes with dotnetcore. Right click on the WebApi project and select “Manage User Secret”. Create a ConnectionStrings json object and have the NorthwindEntities connection string over there.
{
  "ConnectionStrings": {
    "NorthwindEntities": "data source=(localdb)\\MSSQLLocalDB;initial catalog=Northwind;integrated security=True;multipleactiveresultsets=True;App=EntityFramework"
  }
}
Run the API project and navigate to /api/customer and you should get the response back. You could add Application Insights for monitoring by right clicking on the API project and Add -> Application Insights Telemetry. This would enable the logs to flow into application insights without any additional code changes.
It is time to migrate any test cases for this use case. The approach for test case migration will be similar. Once migrated ensure all the test cases pass and the output from the legacy system and the modernized application match each other.
We have successfully migrated a single use case from our legacy application into ASP.NET Core. This project is ready to be deployed into variety of cloud services or dockerized and become available as a container. It is scalable and cloud ready.
Modernizing Database
Although this post was meant to focus on the application side, I feel that I wouldn’t be doing you justice if I don’t talk about database migration also. Database migration in itself is a huge topic and a candidate for its own blog so here I will only touch upon few aspects of it.
Cloud provides us with wide variety of databases to choose from. Usually legacy application has some RDBMS as the database and today’s cloud provider provides most of them as PaaS service. Migration strategy of database depends upon individual project needs. You may choose to move the database to one of the PaaS offering from the cloud or you may choose to re-engineer into NoSQL.
In my project we moved an on-premise SQL Server to Azure SQL Server and I will briefly mention about two aspect of the migration - database itself and SQL Server Jobs.
Migration of database
Migration of the SQL Server database to Azure SQL Database was done with the help of Database Migration Assistant tool. The tool generates assessment reports that provide recommendations to guide you through the changes required prior to performing a migration. The report will also contain what features used in your current database is no longer supported at the target environment. This will help you to understand the feature parity between source and target and assist you to make informed decision about the migration. It also has ability to perform the migration itself.
Migration of SQL Jobs
Here again there are multiple strategies that can be adopted. I used following two services for our use cases -
-
Azure Elastic Jobs is a job scheduling service that execute custom jobs on one or many Azure SQL Databases. Elastic Database Jobs provide the ability to run one or more T-SQL scripts in parallel, across a large number of databases, on a schedule or on-demand. This service is in preview as of writing this blog and so there are few limitations. It does not yet integrates with Azure Monitor so monitoring and telemetry are difficult to get to. So if a job fails there is no out of the box feature to trigger something else. The job history are stored in a table which needs to be monitored for such kind of failures.
-
Azure Data Factory is the cloud-based ETL and data integration service. ADF can be used to create workflows using Stored Procedures and can also be integrated with Azure Logic Apps which provides a lot of flexibility. You can also send any HTTP request from ADF to trigger services or perform other operations.
Conclusion
Modernization of legacy application is inevitable. Sooner or later they will be replaced by newer technology. As technology is growing at incredible pace, having a migration strategy is important. I tried to put forward learnings from my own experience and presented a generic approach to modernize any application. If you have any questions or suggestions leave it below.