Transferring chat to a human agent using Microsoft Bot Framework
A tutorial on how to perform live agent transfer / human handover using Microsoft Bot Framework
Source Code: Human Handover Bot
One of the frequent questions which I am asked is how to transfer chat to a human from the bot. It is especially necessary if your bot is in space of customer service. Chat bots are not meant to (or atleast, not mature enough currently) to completely replace humans. Many a times chat bot will fail to answer satisfactorily or user would just want to talk to a human from the start. When this happens the chatbot should transfer the chats to a human agent or a customer care representative. But how can we achieve that?
In this article, I will give an overview on how we can integrate a live chat into our bot using Microsoft Bot Framework. Microsoft Bot Framework is highly extensible and lets us do this easily. The source code is available over at my github repo.
High Level Overview
Our bot would be central piece to whole solution. Apart from performing all it’s normal functionality, our bot would also act as a proxy between user and agent. So, what is required to create this feature and who are the actors involved?
Actors Involved
- Bot: Well, we have our bot (duh!).
- Users: Users are our customers who would be using our bot. Our users can be on any channel which are supported by Bot Framework.
- Agent: Agents are humans who would chat with our users. Our agent will also need a chat window. For this we will use Bot Framework Web Chat as a dashboard for our agents.
Running the bot
Let us first run the bot and see how it works. Nothing helps better in understanding than running the code and seeing it first hand.
To run the bot, follow the steps -
-
Create a Luis app by importing
LuisModel\AgentTransfer.json. The bot uses Luis to understand if user wants to talk to an agent. If you don’t want to use Luis, I have included anEchoDialogclass which would also work. You will need to modify the code to startEchoDialoginstead ofTransferLuisDialogwhen message arrives (left as exercise to the reader). If you do this, go to step 3. -
Get the ModelId and SubscriptionKey of the Luis App and paste it into
LuisModelattribute inTransferLuisDialog.cs. -
Run the solution by pressing
F5. By default, it should start at port 3979. If not, note the port it runs on and stop debugging. -
We will use ngrok to debug the bot locally. Download and run
ngrokusing commandngrok.exe http --host-header=rewrite <port number>. Copy the Forwarding URL (https) which is genrated by ngrok. -
Register a new bot in Bot Framework Portal using URL generated by ngrok. Copy the Microsoft App Id and App Password and paste it in
web.config. -
Agent Dashboard uses Direct Line as a channel. So, enable direct line and keep its Secret Key handy.
-
Run the solution once again.
To open Agent Dashboard go to http://localhost:3979/agentdashboard/index.html?s=DIRECTLINE_SECRET_KEY. Change the port number accordingly if it is not 3979. Notice the query string ?s=. Enter the Direct Line secret key as the value of the query string.
You will get the page similar to below.
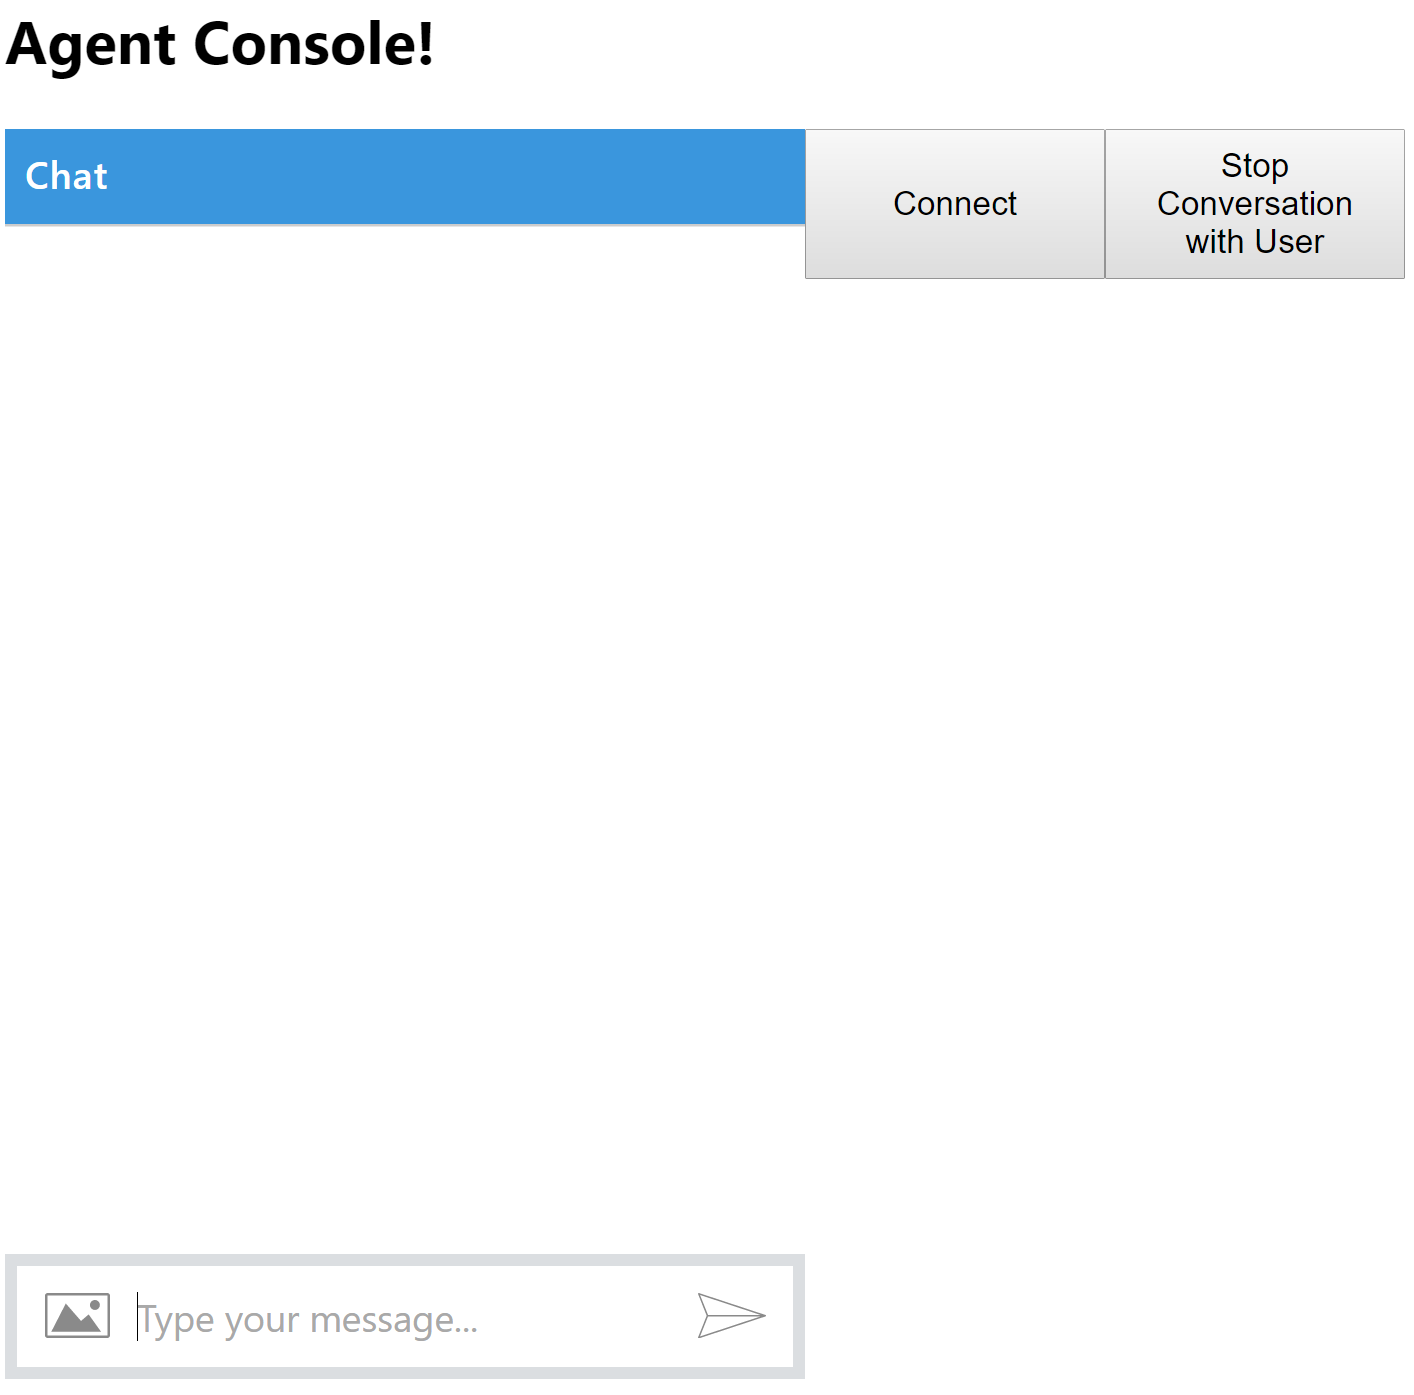
Click on Connect button to register yourself as an agent. If you get successfully registered, the heading in the page will change to show the “Connected” status. This makes the agent available for chat.
Use any other channel (skype or web chat at bot portal) to simulate a user. Currently there is only one Luis intent AgentTransfer which is triggered by typing “Connect me with customer care”. Enter it to start talking with agent.
Using emulator will not work.
If you are using
EchoDialog, agent transfer can be achieved by typing anything starting with letter ‘a’. Typing anything else will just echo back.
Once user has initiated the conversation with an agent, any messages user sends will be delivered to the agent (instead of being handled by bot) and vice versa.
To stop conversation with user, click on Stop Conversation with User button on agent dashboard. Click on Disconnect to remove agent from available pool.
We will see how each of these works shortly, but first let us understand some of the concepts involved in it.
Building Blocks
Let us understand what we did while running the code. We will divide the flow into logical groups -
-
Initiating Transfer: A user can initiate a transfer to an agent anytime. Initiation is successful if an agent is available for chat. A user can only talk to one agent at a time. Once initiated, all the messages from user will be routed to the agent instead of being handled by current
Dialog. -
Agent Availability: An agent is termed available if he is not already in an exisiting conversation with a user. This effectively means that an agent can only talk to one user at a time. In other words, Agent and User have 1:1 mapping.
-
Agent User Mapping: We established that an agent and a user have 1:1 mapping. Since we have to route messages to and fro, we must maintain this mapping somewhere.
-
Message Routing: Message is routed by fetching the Agent User Mapping and sending the current message to it’s counterpart. For example, if a user sends a message, we fetch the agent associated with that user, and send the message text to the agent. Same applies the other way around.
-
Stopping Conversation: Stopping the conversation should prevent bot from routing any further messages to and fro agent and user. This effectively means that we remove the Agent User Mapping. Stopping the conversation will also make the agent available once again.
-
Disconnecting Agent: Disconnecting an agent means we remove the agent from availability pool. No further initiation can happen with this agent.
Solution Structure
This is a pretty lengthy explaination so I suggest you keep the solution open and follow as I explain each classes.
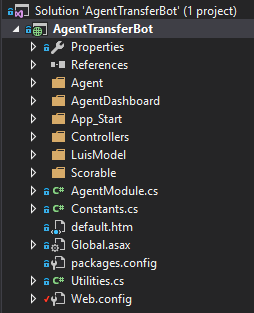
The most important pieces of code which I want to highlight are
- Agent folder contains everything related to agent management and routing implementation.
- AgentDashboard folder contains index.html which has Web Chat control embedded. We will use this page for agent to chat. How it works we will see later.
- Scorable folder contains two
IScorableimplementations which serves as middleware to route messages. We will get into its details later. - AgentModule class contains
Autofacregistrations for our project.
There are five key interfaces in our solution, all lying in Agent folder. They are -
-
IAgentProvider: Contains methods for Adding, Removing and getting Next Available agent. When agent connects, we add the agent to availability pool by usingAddAgentmethod. Similarly,RemoveAgentmethod is used to remove the agent.GetNextAvailableAgentmethod should get the next available agent from availability pool and remove the agent from the pool in an atomic way, so that same agent is not returned twice. -
IUserToAgent: As the name suggests, is used to send messages from user to agent. It’s methodSendToAgentAsyncdoes exactly that. It contains two other methods -IntitiateConversationWithAgentAsyncto initate a transfer for first time andAgentTransferRequiredAsyncto check if routing is required. -
IAgentToUser: Contains a single methodSendToUserAsyncto send the message from agent to user. -
IAgentUserMapping: Contains methods for adding, removing and fetching the Agent User Mapping. -
IAgentService: Acts as a business class mainly for registering agent, unregistering agent and stopping a conversation. In addtion it contains other methods to check if agent is in existing conversation and whether the message is from an actual/valid agent.
Apart from the interfaces, there are two scorables in Scorable folder. Scorable in Bot Framework acts as a middleware to the incoming messages. Using Scorable we can intercept message and take decisions before it is sent to the waiting dialog. We have following scorables in place -
-
AgentToUserScorable: Intercepts messages coming from agent and routes it to user if agent is in conversation with user. -
UserToAgentScorable: Intercepts messages coming from user and routes it to agent if user is in conversation with agent.
Availability Pool
When an agent connects we add him to availability pool. InMemoryAgentStore which derives from IAgentProvider, maintains this pool using an in-memory ConcurrentDictionary. We are not worried about the implementation detail; however, it mimics a “queue” therefore guaranteeing that an agent is only fetched once.
In an actual production scenario, you would maintain this list using an out-proc data store such as RabbitMQ and implement IAgentProvider to to interface with that.
Agent Registration
Agent registration is done through RegisterAgentAsync(IActivity activity, CancellationToken cancellationToken) of AgentService. This method is called when agent clicks on “Connect” button in the dashboard. AgentService is a concrete implementation of IAgentService.
RegisterAgentAsync method first adds a new instance of Agent in to the availability pool using IAgentProvider AddAgent(Agent agent) method.
Once this is successful, it adds a metadata to the agent’s UserData store. We use this metadata information to identify whether the incoming message is from an agent or a user.
In a production use case this is not importnat as your agent would most likely require to logging in, and therefore you can identify them by passing a valid token (or in any other way depending upon your requirments). I added the metadata to keep things simple for this sample.
Disconnecting Agent
When agent clicks on Disconnect button on dashboard, we just remove the agent from availability pool by calling UnregisterAgentAsync(IActivity activity ...) method in IAgentService. The same method also clears the metadata information which was stored in agent’s store.
In a production scenario, you would not allow agent to disconnect if he is already in a conversation with a user. However, in this sample I have not implemented this.
Agent User Mapping
Agent User Mapping is a crucial piece in our overall design. Methods for Setting and Getting this mapping is present in IAgentUserMapping interface. BotStateMappingStorage implements this interface and provides implementation of proper storage of these mapping. The mapping is not stored in memory. Instead it is stored in Bot State Service.
To give a brief background, Microsoft Bot Framework provides three stores to store user state. These are
-
User Data Store: To store data specific to a user.
-
Conversation Store: To store data specific to a conversation.
-
Private Conversation Store: To store data specific to a user in a conversation
We utilize these to store Agent User Mapping in following ways -
-
The Agent which the user is talking to is stored in User’s Private Conversation Store.
-
The User which the agent is talking to is stored in Agent’s Private Conversation Store.
This clever design (😄) makes the Agent User Mapping storage distributed and moves the responsibility of maintaining it to Bot State Service.
But what do we save in the states?
We save the address of the agnet and the user respectively. More specifically we save the ConversationReference of the user and agent. ConversationReference can then be used to route message to the receiver on proper channel.
We have two classes named Agent and User each having a property of type ConversationReference. We store Agent and User class instances into User and Agent store respectively.
Initiating Conversation
When a user wants to connect to the agent, we call IntitiateConversationWithAgentAsync of IUserToAgent. The method first checks if there are any available agent and fetches the next agent from availability pool. Once we get an agent, we create Agent User Mapping and store it into the states as described in previous section.
Message Routing
Message is routed by fetching the Agent User Mapping. When a message arrives, we retrieve the state associated with the sender. Since our Agent User Mapping is maintained in the state, we get that information too.
User to Agent Route
When user sends a message UserToAgentScorable checks if the message needs to be routed to an agent or not. This check is done by calling AgentTransferRequiredAsync method in IUserToAgent.
AgentTransferRequiredAsync method just checks if the user has the agent mapping in its store. If we find Agent class in its store, it means that the user is in the conversation with an agent. The scorable will then route the message to the agent by calling SendToAgentAsync method in IUserToAgent.
SendToAgentAsync will use the ConversationReference of agent to create a new Activity and send it to agent through Bot Connector.
Due to our implemetnation of
Scorable, we are not modifying theDialogStackof the user. This means that when the conversation with agent is stopped, the user returns to same state (Dialog) he was with the bot before the transfer.
Agent to User Route
Agent to user flow is also very similar to the above. When a message arrives, AgentToUserScorable first check if the sender is an agent. It does so by checking the metadata information which we store when registering the agent.
Depending upon your requirements, you would have your own logic of checking if the Activity is from an actual agent.
Once we get a message from a valid agent, we then check if the agent is already in an existing conversation. This is done in similar way as described in last section. If we get a valid User in agent’s store, AgentToUserScorable will route the message to the user by calling SendToUserAsync method in IAgentToUser.
Stopping Conversation
Stopping a conversation simply means removing the Agent User Mapping. If this mapping is removed, no further messages would be routed from either user or agent. The implementation of it is done in AgentService class. In this sample only an agent can stop the conversation bbby clicking “Stop Conversation with User” button in dashboard.
Agent Dashboard
As mentioned before, we use Bot Framework Web Chat as a channel for agent. But instead of just using an <iframe>, we directly reference the javascript. I have included botchat.js and botchat.css in the solution by building the Bot Framework Web Chat project. Directly referencing the web chat allows us to use its advanced features which we will see below.
To give a short introduction, Web Chat uses Redux architecture to manage its state. It uses DirectLineJs to connect with the Direct Line API. DirectLineJs uses RxJs to create an Observable which we could subscribe to receive events.
First, we create DirectLine instance. Notice the direct line secret is passed through query string parameter.
var botConnection = new BotChat.DirectLine({
    secret: params['s'],
    token: params['t'],
    domain: params['domain'],
    webSocket: params['webSocket'] && params['webSocket'] === "true"
});
Next, we use call BotChat.App passing the Direct Line instance we created above.
BotChat.App({
    botConnection: botConnection,
    user: user,
    bot: bot
}, document.getElementById("BotChatGoesHere"));
Tip: You can specify an id and a name in
userobject. These values will be reflected inFromfield inActivitywhich is received by out bot.
Now here comes the interesting part. The two buttons in the page do not make ajax calls to any controller explicitly. Instead they use DirectLineJs to send a message to our bot. These messages are different than messages sent when user types something in the chat window. These messages have different type.
If you have noticed, our Activity class has a Type field. A normal chat message Activity has Type = "message". You might be aware that there are messages with different types such as conversationUpdate, typing, ping etc. Messages of some of these types are sent by Bot Framework itself such as conversationUpdate is sent when a memeber is added or removed from conversation.
There is another type called event which represents an external event. As of now, Bot Framework by default does not send any messaages of type event. This is left for us developers to use depending upon our requiremnts. We can create a message of type event and sent it to our bot. The bot would recieve it as a normal Activity which would have all the relevant fields populated such as From, Recipient, Conversation etc.
In this example, on button clicks we send messages of type event. For connect button we send message of type event and name="connect". Similarly, for disconnect we send message with name="disconnect".
const connect = () => {
    var name;
    if(!connected)
        name = "connect"
    else
        name = "disconnect"
    botConnection
        .postActivity({type: "event", value: "", from: user, name: name})
        .subscribe(connectionSuccess);
};
To send messages we use postActivity method of botConnection. We then subscribe to it so we can get back the status whether it was successful or not.
Stop Conversation button works in exactly same way.
const stopConversation = () => {
    botConnection
        .postActivity({type: "event", value: "", from: user, name: "stopConversation"})
        .subscribe(id => console.log("success"));
};
In our bot, we handle these messages in HandleSystemMessage method in MessageController class.
else if (message.Type == ActivityTypes.Event)
{
    using (var scope = DialogModule.BeginLifetimeScope(Conversation.Container, message))
    {
        var cancellationToken = default(CancellationToken);
        var agentService = scope.Resolve<IAgentService>();
        switch (message.AsEventActivity().Name)
        {
            case "connect":
                await agentService.RegisterAgentAsync(message, cancellationToken);
                break;
            case "disconnect":
                await agentService.UnregisterAgentAsync(message, cancellationToken);
                break;
            case "stopConversation":
                await StopConversation(agentService, message, cancellationToken);
                await agentService.RegisterAgentAsync(message, cancellationToken);
                break;
            default:
                break;
        }
    }
}
This is how agent connects and disconnects from out bot. Using direct line to send these “event” messages, we get full context of who has raised the event. It also eliminates the need of creating any “supporting” endpoints just so that we can send some events to the bot.
Almost Done
This completes my tutorial on creating a bot to transfer chats to a human. I have explained all the major concepts involved in achieving this. I have tried to make the code as extensible as possible, nonetheless it could serve as a reference if you want to achieve the same thing.
I cannot close this article without mentioning one of the major shortcoming of this approach. Web Chat channel or Direct Line does not send any event if the client disconnects. If an agent losses the connectivity or closes the dashboard, we do not receive any event regarding this. This means that there is no way of knowing if the agnet is online. It is specially a problem if the agent is in a conversation with the user and suddenly there is a network failure at his end. Ideally in this scenario I would want to re-route the user to next available agent. But since we don’t receive any connectivity information from Direct Line by default, it is left to us to implement a solution.
Let me know your thoughts on this in comments below and ask any questions that you may have. By the way do share the blog if you liked it.