Integrating CRIS with Microsoft Bot Framework
Skype Call your bot by integrating Microsoft Bot Framework with Custom Speech Service (CRIS)
Couple of months ago I wrote an article on how to skype call a bot. Behind the scene, the bot used Bing Speech API to perform Speech-To-Text(STT) conversion to get plaintext output of what user spoke. It was all cool but I was fairly disappointed with accuracy of Bing Speech. It failed miserably when using domain specific terminology and also did not perform so well with my accent(Indian). Also it did not fair nicely in a noisy environment.
All of these issues goes away with new service called Custom Speech Service(CRIS) which Microsoft made it available as Public Preview earlier this month. You may be wondering what letter R and I stands for in CRIS. Well CRIS was earlier known as Custom Recognition Intelligent Service, but Microsoft renamed it to Custom Speech Service (though I believe the former sounded much cooler).
CRIS lets us create a customized language and acoustic model. What are these models?
-
Language Model: The language model decides what sequence of words are more likely to occur in a sentence. It does it by creating a probability distribution over over sequence of words. You train the language model by providing a plaintext file containing list of sentences which are similar to what user would speak.
-
Acoustic Model: The acoustic model would break down a short fragment of audio and classify it into one of the phonemes. This can help the system to recognize domain specific words in a sentence such as “When did Neanderthal became extinct”. Acoustic models are trained by providing audio files of speech data and a text file of its corresponding transcript. The audio data should be as close to the environment where you expect your app/bot to be used most. For example, if you expect your user to use your bot on road, you should provide audio files of people speaking on road. Acoustic model can then learn the environment and would work much better.
More details about the models are available in the documentation. In this sample, we would only train the Language model and use the base acoustic model.
Getting Started
To use CRIS you would need to get a subscription from Azure. Don’t worry, CRIS is free till 5000 requests/month, so you could try it out. Once you get your subscription key, you need to add it to CRIS portal. Follow the guide to get it done.
We would be using the same source code that I created for skype call a bot post. We would just modify it to support CRIS. I recommend you go through the post first before continuing. Since we would be using the same code base, we would inherit all the bad designs which I described in previous post specially how the response is sent. I absolutely dislike the way I had done it. You are better off using some other way(preferably reactive programming) to achieve the same. In any case, the source code could be found here.
Training Language Model
As mentioned above, training data for Language model is just plaintext file. The file should contain list of utterances with one sentence per line. The sentences may not be complete sentences or grammatically correct as long as it accurately reflects what user would speak. There are some main requirements such as encoding, size limit etc which you can read in the documentation.
I have created a simple file for sample which you could find in CRIS folder in the code. Note that I have just added few sentences for example purpose. Feel free to extend it by adding more sentences. Also you could add part of sentence or words which you think user would most likely speak such as city names.
Once we have training data ready we need to import it in CRIS. Go to Language Data tab by clicking on Menu -> Language Data and click on Import New. Enter the data name and select the text file to upload.
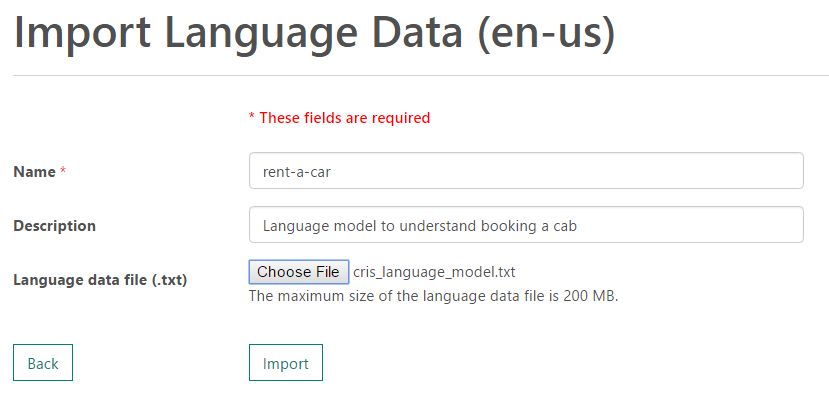
Once the training data is uploaded it would be queued for processing. You could check the status of it by going to Language Data tab(it should redirect automatically). Wait till it status is shown as Complete.
Next we need to create a Language Model. Go to Language Model page and click on Create New. Give a name and description to your model. There are two types of base model -
-
Microsoft Conversational Model is optimized for recognizing speech spoken in conversational style.
-
Microsoft Search and Dictation Model is appropriate for short commands, search queries etc.
We would be using the Conversational Model base model, since we expect our user to talk to our bot rather than give commands. Select the Language Data that we uploaded in previous step. Once form is filled click on Submit.
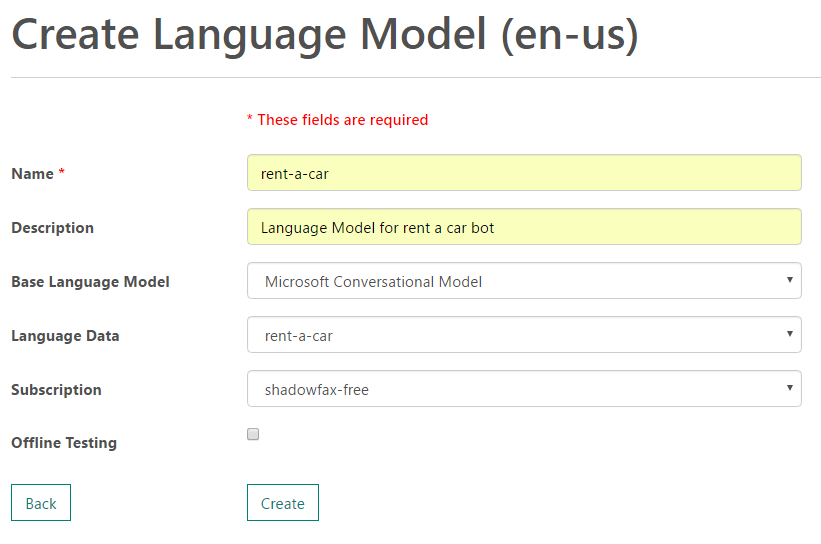
Similar to previous step, the language model training would take some time. Wait till the status is Complete.
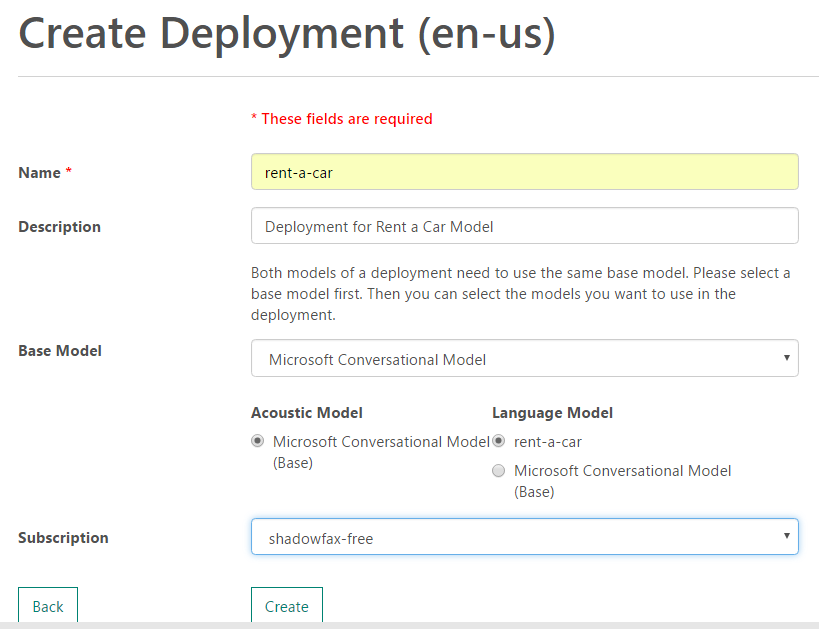
Once the model is successfully created, go to Deployments page and create a new deployment. In the form presented, select the base model as Microsoft Conversational Model and select our trained Language model. For Acoustic Model, select the default base model which is shown.
Once the deployment is complete, you would be redirected to the Deployment Information page where you would need to copy the Url specified in WebSocket for ShortPhrase Mode. We would require the Url later in the code.

Integrating CRIS with Bing Speech SDK
We would continue using the Bing Speech client library for STT. But instead of calling to Bing Speech API we would send the speech to our CRIS deployment. We only need to change how our DataRecognitionClient is created as shown below.
 public string SubscriptionKey { get; } = "CRIS SubscriptionKey";
 public string CrisUri { get; } = "CRIS ShortPhrase Mode URL";
 public string AuthenticationUri { get; } = "https://westus.api.cognitive.microsoft.com/sts/v1.0/issueToken";

 public void CreateDataRecoClient()
 {
     dataClient = SpeechRecognitionServiceFactory.CreateDataClient(
         SpeechRecognitionMode.ShortPhrase,
         DefaultLocale,
         SubscriptionKey,
         SubscriptionKey,
         CrisUri);

     dataClient.AuthenticationUri = AuthenticationUri;

     dataClient.OnResponseReceived += OnDataShortPhraseResponseReceivedHandler;
 }
Paste the deployment URI for Short Phrase which we copied from before in CrisUri and also enter the CRIS subscription key in SubscriptionKey. We would continue to use the ShortPhrase mode as we did before. The only difference now is that the speech is now sent to CRIS instead of Bing Speech API. Leave the AuthenticationUri as it is as it does not needs to be changed.
Apart from this there are no other changes required. You could run the bot as it is and it would work out. Check my previous post on how to run and test this bot. Do not forget to a valid LUIS subscription key in RentLuisDialog and change MicrosoftAppId, MicrosoftAppPassword and CallbackUrl appropriately.
Conclusion
I have been waiting for CRIS for a long time and it is finally available to use. It works so much better than Bing Speech API and looks really promising. However I don’t think that Calling Bot is matured enough yet. It looks a little sketchy and entire flow is not smooth, but it is still in preview so lets wait and watch. Meanwhile try out training Acoustic Model and let me know in the comments how did it work out.