IdentityServer4 on Docker
A tutorial on how to host IdentityServer 4 on Docker
With Microsoft supporting .NET on Linux and docker supporting running containers on Windows, its a great time to be working on .NET stack. Now you can develop and test .NET code on containers directly from Windows without having to switch OS. Moreover Docker is beta testing its new program which makes running containers on Windows much easier. For this post we will go oldschool and use docker toolbox.
What is IdentityServer?
IdentityServer is an open source .NET implementation of OpenId Connect protocol. I have been following its development deeply since I came to know about it last year. IdentityServer4 is being developed completely on ASP.NET Core which means if built on .NET Core, it would work cross platform.
Note: While writing this article, IdentityServer4 is in Beta. Some features such as session management is not implemented yet.
Below I would detail on how to host IdentityServer4(IdSrv in short), a sample API which checks for access token and a simple javascript client in docker running on Windows. The code can be found in my github repo. This repo is essentially a fork of IdentityServer4 Samples with few changes where I have deleted other clients and changed some configurations URLs (more detail below). Lets get started.
Get Docker
Install Docker Toolbox for Windows by following instructions here.
Create a Docker VM
Create a new Docker VM by writing following command in Command Prompt.
docker-machine create --driver virtualbox --virtualbox-no-vtx-check idsrv-demoDocker Toolbox installs Oracle VirtualBox which has known issue if you have hyper-v installed. In case you are experiencing issues while creating Docker VM, follow Hanselman’s post on how to switch between hyper-v and virtualbox.
Lets break down the above command.
docker-machine: Docker Machine allows us to provision and manage our Dockerized hosts (hosts with Docker Engine on them).create: Create command creates a Linux Virtual Machine and installs docker engine to it.--driver virtualbox: Docker Machine supports multiple virtualization options and environment. We will be using virtualbox which comes installed with docker toolbox. Have a look at complete list of supported driver for more information.--virtualbox-no-vtx: This is only required if you have Hyper-v installed and have disabled Hyper-v. This command disables checking for other hardware virtualization before VM is started.idsrv-demo: Name of the virtual machine which will be created.
Run docker-machine ls to verify if the VM is created and running. Note the URL of the VM. This URL will be used to access any application in containers hosted on this VM.

Setup the environment by running docker-machine env --shell=cmd idsrv-demo and following the instructions at prompt.

Change URLs in the code
You will have to change the URLs in your code to point to the new VM URL in the following places:
IdSrvHost\Configuration\Clients.cs: Change all the URL here to point to the VM. Leave the port to 7017 as we will host our client on the same port.SampleApi\Startup.cs: Change the URL inapp.UseIdentityServerAuthentication. Leave the port as 22530.JavaScript Oidc\wwwroot\index.html: There are two places in this file where URL needs to be changed. Leave the port number as it is in each place.project.jsonin each project: Change thewebcommand to pass option to Kestrel to listen to specific URL. This is required as by default the docker container will start the application and listen to0.0.0.0which is not same aslocalhost. Port number here specifies which port needs to be opened in docker container. This is already been done in my sample. In case you are using your own code, do the following changes.- IdSrvHost:
"web": "Microsoft.AspNet.Server.Kestrel --server.urls=http://0.0.0.0:22530 - Javascript Oidc:
"web": "Microsoft.AspNet.Server.Kestrel --server.urls=http://0.0.0.0:7017 - SampleApi:
"web": "Microsoft.AspNet.Server.Kestrel --server.urls=http://0.0.0.0:3860
- IdSrvHost:
Publish the projects
Go to each project folder and run dnu publish to publish in your desired folder.
dnu publish -o <Path to output directory>Add a Dockerfile
Create a platintext file and name it as Dockerfile (without extension) in the root of output of each of the published project. It should sit together with approot, wwwroot and logs folder. Paste the following content in the Dockerfile.
FROM microsoft/aspnet:1.0.0-rc1-update1-coreclr

COPY . /app
WORKDIR /app/approot

EXPOSE <PORT>
ENTRYPOINT ["./web"]
FROM microsoft/aspnet:1.0.0-rc1-update1-coreclr: Docker creates the container on a base image. Docker runs each following instructions on top of this base image. Here we use aspnet image provided by Microsoft. To learn more visit the docker hub.COPY . /app: Copy the current folder to/appfolder in container.WORKDIR /app/approot: Set the WORKDIR to /app/approot folder. This sets the working directory in container and executes remaining command from this directory.EXPOSE <PORT>:EXPOSEinstruction informs Docker that the container listens on the specified network ports at runtime.EXPOSEdoes not make the ports of the container accessible to the host. We will do that later during creating container. Substitutefor appropriate port as mentioned in project.json above. - IdSrvHost: 22530
- Javascript Oidc: 7017
- SampleApi: 3860
ENTRYPOINT ["./web"]: This instruction will executewebscript in current folder. Note that we had changed the working directory to/app/approot.
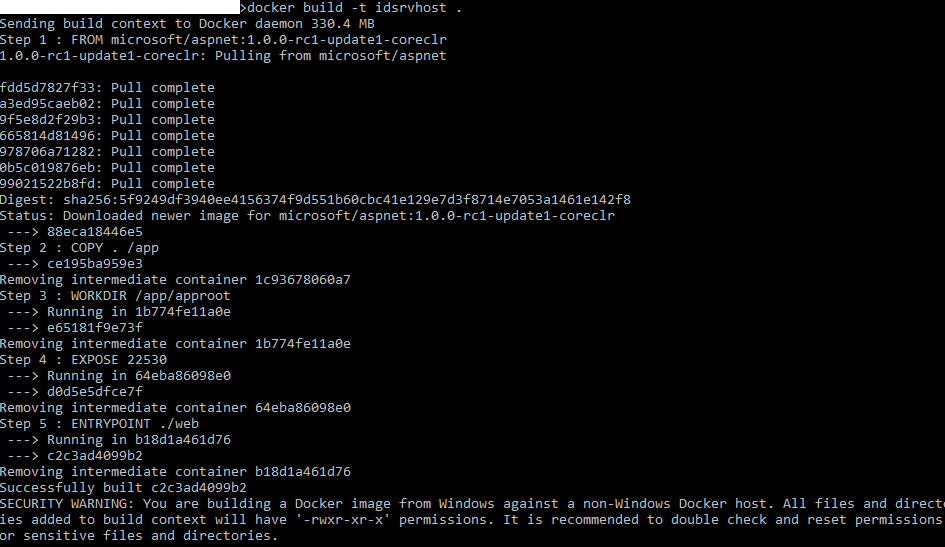
Build Image
Go to the root of the published output of each project and run the following command to create a new image. This will download the base image from docker hub and may take time depending upon internet connection.
docker build -t idsrvhost .docker build: Builds a new image from Dockerfile-t idsrvhost: Sets the tag of the image..: The PATH to build the image from. By default docker searches for Dockerfile in PATH/Dockerfile.
Do the same for each of the projects but change the tag name. Run docker images to view all the generated image.

Create the container
We will create one container for each image. Run the following commands to create and start the containers.
docker run -d -p 22530:22530 --name idsrv-host idsrvhost
docker run -d -p 7017:7017 --name client jsclient
docker run -d -p 3860:3860 --name api sampleapi
docker run: Creates and start a new container.-d: Run the container in background.-p <host>:<container>: Map the specified port of host to the port container.--name <ContainerName>: Creates the container with the specified name.- The last parameter is the name of the image from which to create the container.
Run docker ps to view all the created containers.

Thats it.
Open the browser and go to the URL:PORT to view each of the site. Open URL:7017 to play with the javascript client.

Conclusion
Docker is great and very easy once you get hang of it. Next step you can try -v command to mount the source code to container without having to publish the site. This is incredibly helpful during development where you want to avoid hassle of publishing and creating new images every time you make a change.